RunNumber:12,Lapse:34,Operator:me みたいなデータ) を表形式で表示Redis のサイトに行って Redis-Stack のイントール方法に従う: https://redis.io/docs/stack/get-started/install/linux/
以下のファイルを /etc/yum.repos.d/redis.repo に作成
[Redis]
name=Redis
baseurl=http://packages.redis.io/rpm/rhel7
enabled=1
gpgcheck=1
以下のコマンドを実行
$ curl -fsSL https://packages.redis.io/gpg > /tmp/redis.key
$ sudo rpm --import /tmp/redis.key
$ sudo yum install epel-release
$ sudo yum install redis-stack-server
インストール直後
$ sudo systemctl status redis-stack-server
● redis-stack-server.service - Redis stack server
   Loaded: loaded (/etc/systemd/system/redis-stack-server.service; disabled; vendor preset: disabled)
   Active: inactive (dead)
     Docs: https://redis.io/
スタートさせてみる
$ sudo systemctl start redis-stack-server
$ sudo systemctl status redis-stack-server
● redis-stack-server.service - Redis stack server
   Loaded: loaded (/etc/systemd/system/redis-stack-server.service; disabled; vendor preset: disabled)
   Active: active (running) since 火 2023-06-06 12:40:11 PDT; 3s ago
     Docs: https://redis.io/
 Main PID: 4099 (redis-server)
    Tasks: 14
   CGroup: /system.slice/redis-stack-server.service
           └─4099 /opt/redis-stack/bin/redis-server *:6379

 6月 06 12:40:11 vs13centos7 redis-server[4099]: 4099:M 06 Jun 2023 12:40:11.578 * <ReJSON> version: 20007 git sha: e51b585 branch: HEAD
 6月 06 12:40:11 vs13centos7 redis-server[4099]: 4099:M 06 Jun 2023 12:40:11.578 * <ReJSON> Exported RedisJSON_V1 API
 6月 06 12:40:11 vs13centos7 redis-server[4099]: 4099:M 06 Jun 2023 12:40:11.578 * <ReJSON> Enabled diskless replication
 6月 06 12:40:11 vs13centos7 redis-server[4099]: 4099:M 06 Jun 2023 12:40:11.578 * <ReJSON> Created new data type 'ReJSON-RL'
 6月 06 12:40:11 vs13centos7 redis-server[4099]: 4099:M 06 Jun 2023 12:40:11.578 * Module 'ReJSON' loaded from /opt/redis-stack...son.so
 6月 06 12:40:11 vs13centos7 redis-server[4099]: 4099:M 06 Jun 2023 12:40:11.578 * <search> Acquired RedisJSON_V1 API
 6月 06 12:40:11 vs13centos7 redis-server[4099]: 4099:M 06 Jun 2023 12:40:11.578 * <graph> Acquired RedisJSON_V1 API
 6月 06 12:40:11 vs13centos7 redis-server[4099]: 4099:M 06 Jun 2023 12:40:11.578 * Module 'bf' loaded from /opt/redis-stack/lib...oom.so
 6月 06 12:40:11 vs13centos7 redis-server[4099]: 4099:M 06 Jun 2023 12:40:11.579 * The AOF directory appendonlydir doesn't exist
 6月 06 12:40:11 vs13centos7 redis-server[4099]: 4099:M 06 Jun 2023 12:40:11.579 * Ready to accept connections
Hint: Some lines were ellipsized, use -l to show in full.
$ redis-server --version
Redis server v=6.9.241 sha=00000000:0 malloc=jemalloc-5.2.1 bits=64 build=79cf147c911caf62
自動起動の設定
Redis-py のページ(https://redis-py.readthedocs.io/en/stable/)には Python 3.7+ と書いてあったけれど,CentOS7 の Python 3.6.8 でもいけた.
$ pip3 install redis
Collecting redis
  Downloading https://files.pythonhosted.org/packages/d6/f6/19237b28c632935c7359bddf703395ba13bbd134fc5e2eb297c4c120398c/redis-4.3.6-py3-none-any.whl (248kB)
    100% |████████████████████████████████| 256kB 2.4MB/s
Collecting typing-extensions; python_version < "3.8" (from redis)
  Downloading https://files.pythonhosted.org/packages/45/6b/44f7f8f1e110027cf88956b59f2fad776cca7e1704396d043f89effd3a0e/typing_extensions-4.1.1-py3-none-any.whl
Collecting importlib-metadata>=1.0; python_version < "3.8" (from redis)
  Downloading https://files.pythonhosted.org/packages/a0/a1/b153a0a4caf7a7e3f15c2cd56c7702e2cf3d89b1b359d1f1c5e59d68f4ce/importlib_metadata-4.8.3-py3-none-any.whl
Collecting packaging>=20.4 (from redis)
  Downloading https://files.pythonhosted.org/packages/05/8e/8de486cbd03baba4deef4142bd643a3e7bbe954a784dc1bb17142572d127/packaging-21.3-py3-none-any.whl (40kB)
    100% |████████████████████████████████| 40kB 7.2MB/s
Collecting async-timeout>=4.0.2 (from redis)
  Downloading https://files.pythonhosted.org/packages/d6/c1/8991e7c5385b897b8c020cdaad718c5b087a6626d1d11a23e1ea87e325a7/async_timeout-4.0.2-py3-none-any.whl
Collecting zipp>=0.5 (from importlib-metadata>=1.0; python_version < "3.8"->redis)
  Downloading https://files.pythonhosted.org/packages/bd/df/d4a4974a3e3957fd1c1fa3082366d7fff6e428ddb55f074bf64876f8e8ad/zipp-3.6.0-py3-none-any.whl
Collecting pyparsing!=3.0.5,>=2.0.2 (from packaging>=20.4->redis)
  Downloading https://files.pythonhosted.org/packages/6c/10/a7d0fa5baea8fe7b50f448ab742f26f52b80bfca85ac2be9d35cdd9a3246/pyparsing-3.0.9-py3-none-any.whl (98kB)
    100% |████████████████████████████████| 102kB 9.0MB/s
Installing collected packages: typing-extensions, zipp, importlib-metadata, pyparsing, packaging, async-timeout, redis
Successfully installed async-timeout-4.0.2 importlib-metadata-4.8.3 packaging-21.3 pyparsing-3.0.9 redis-4.3.6 typing-extensions-4.1.1 zipp-3.6.0
使ってみる
$ python3
Python 3.6.8 (default, Nov 16 2020, 16:55:22)
[GCC 4.8.5 20150623 (Red Hat 4.8.5-44)] on linux
Type "help", "copyright", "credits" or "license" for more information.
>>> import redis
>>> r = redis.Redis()
>>> r.ping()
True
>>> $ curl -fsSL https://packages.redis.io/gpg | sudo gpg --dearmor -o /usr/share/keyrings/redis-archive-keyring.gpg
$ sudo chmod 644 /usr/share/keyrings/redis-archive-keyring.gpg
$ echo "deb [signed-by=/usr/share/keyrings/redis-archive-keyring.gpg] https://packages.redis.io/deb $(lsb_release -cs) main" | sudo tee /etc/apt/sources.list.d/redis.list
$ sudo apt-get update
$ sudo apt-get install redis-stack-server$ pip3 install redisPATH/TO/SLOWDASH/system に cd して makePATH/TO/SLOWDASH/bin/slowdash-bashrc を source (毎回やるか,.bashrc に書く)以下のダミーデータ生成スクリプトは,既存の Redis データがあるとその内容と干渉する可能性があります.すでにデータがある場合はこの手順をスキップして,手持ちのデータを使う方がいいです.
SlowDash に入っている Python ライブラリ SlowPy を使う.SlowPy は Python パッケージだけれど,今回はインストールせずに使うので,環境変数を設定する.それをする bash のスクリプトを source する:
これでダミーデータを生成するスクリプトが走るはず:
$ cd PATH/TO/SLOWDASH/system/client/test
$ ./test-redis.py
[{'key': 'test_graph_01'}, {'key': 'test_histogram_01'}]
[{'key': 'ch00', 'totalSamples': 1, 'firstTimeStamp': None, 'lastTimeStamp': None, 'retentionTime': 3600000}, {'key': 'ch10', 'totalSamples': 1, 'firstTimeStamp': None, 'lastTimeStamp': None, 'retentionTime': 3600000}, {'key': 'ch14', 'totalSamples': 1, 'firstTimeStamp': None, 'lastTimeStamp': None, 'retentionTime': 3600000}, {'key': 'ch04', 'totalSamples': 1, 'firstTimeStamp': None, 'lastTimeStamp': None, 'retentionTime': 3600000}, {'key': 'ch15', 'totalSamples': 1, 'firstTimeStamp': None, 'lastTimeStamp': None, 'retentionTime': 3600000}, {'key': 'ch03', 'totalSamples': 1, 'firstTimeStamp': None, 'lastTimeStamp': None, 'retentionTime': 3600000}, {'key': 'ch11', 'totalSamples': 1, 'firstTimeStamp': None, 'lastTimeStamp': None, 'retentionTime': 3600000}, {'key': 'ch02', 'totalSamples': 1, 'firstTimeStamp': None, 'lastTimeStamp': None, 'retentionTime': 3600000}, {'key': 'ch09', 'totalSamples': 1, 'firstTimeStamp': None, 'lastTimeStamp': None, 'retentionTime': 3600000}, {'key': 'ch08', 'totalSamples': 1, 'firstTimeStamp': None, 'lastTimeStamp': None, 'retentionTime': 3600000}, {'key': 'ch13', 'totalSamples': 1, 'firstTimeStamp': None, 'lastTimeStamp': None, 'retentionTime': 3600000}, {'key': 'ch05', 'totalSamples': 1, 'firstTimeStamp': None, 'lastTimeStamp': None, 'retentionTime': 3600000}, {'key': 'ch06', 'totalSamples': 1, 'firstTimeStamp': None, 'lastTimeStamp': None, 'retentionTime': 3600000}, {'key': 'ch01', 'totalSamples': 1, 'firstTimeStamp': None, 'lastTimeStamp': None, 'retentionTime': 3600000}, {'key': 'ch07', 'totalSamples': 1, 'firstTimeStamp': None, 'lastTimeStamp': None, 'retentionTime': 3600000}, {'key': 'ch12', 'totalSamples': 1, 'firstTimeStamp': None, 'lastTimeStamp': None, 'retentionTime': 3600000}]
[{'key': 'test_graph_02', 'totalSamples': 1, 'firstTimeStamp': None, 'lastTimeStamp': None, 'retentionTime': 3600000}, {'key': 'test_histogram_02', 'totalSamples': 1, 'firstTimeStamp': None, 'lastTimeStamp': None, 'retentionTime': 3600000}]上記データ生成コマンドを走らせたまま別ウィンドウで SlowDash を走らせる:
$ cd PATH/TO/SLOWDASH/Projects/Test_Redis_Simple
$ slowdash channels
[{"name": "Status", "type": "tree"}, {"name": "test_graph_01", "type": "graph"}, {"name": "test_histogram_01", "type": "histogram"}, {"name": "ch00", "type": "timeseries"}, {"name": "ch10", "type": "timeseries"}, {"name": "ch14", "type": "timeseries"}, {"name": "ch04", "type": "timeseries"}, {"name": "ch15", "type": "timeseries"}, {"name": "ch03", "type": "timeseries"}, {"name": "ch11", "type": "timeseries"}, {"name": "ch02", "type": "timeseries"}, {"name": "ch09", "type": "timeseries"}, {"name": "ch08", "type": "timeseries"}, {"name": "ch13", "type": "timeseries"}, {"name": "ch05", "type": "timeseries"}, {"name": "ch06", "type": "timeseries"}, {"name": "ch01", "type": "timeseries"}, {"name": "ch07", "type": "timeseries"}, {"name": "ch12", "type": "timeseries"}]
ちゃんとデータが見えているので,ポート番号を指定して SlowDash を走らせる:
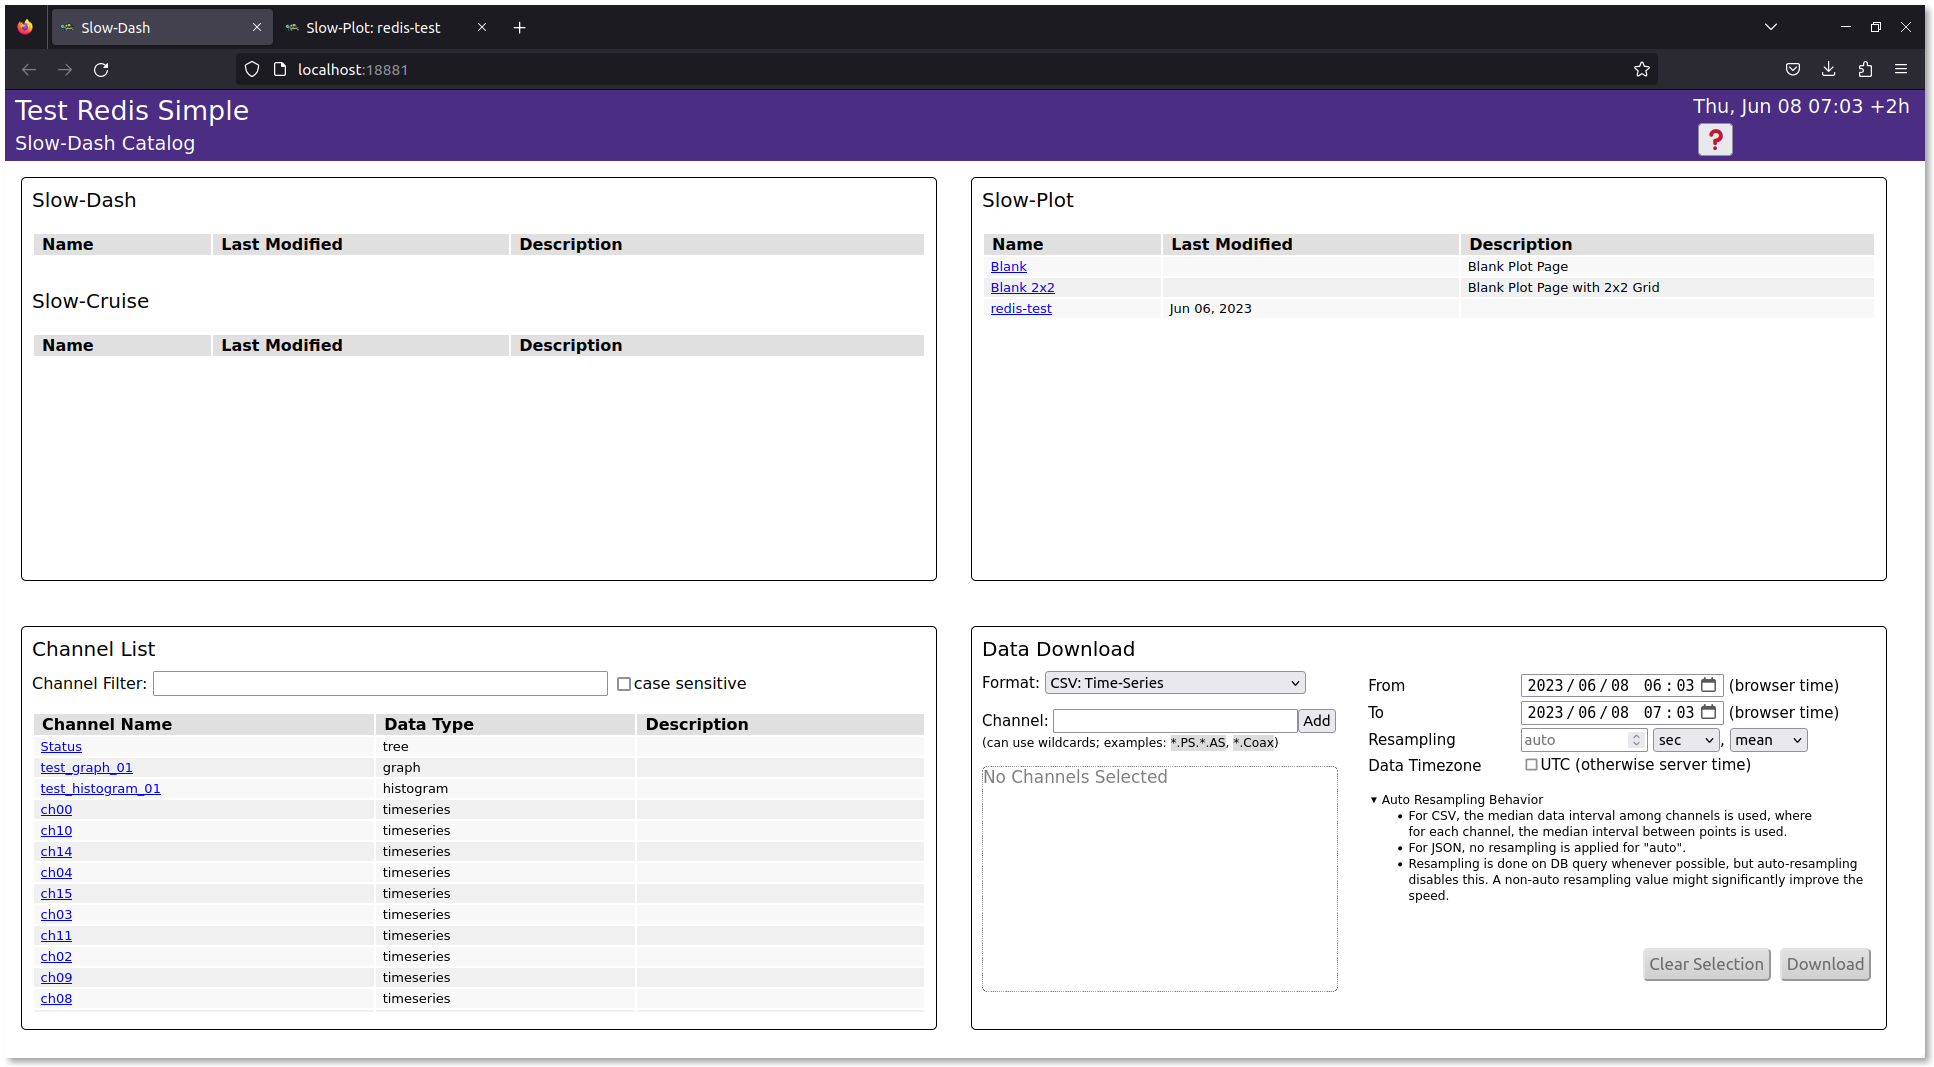
ブラウザで http://localhost:18881/ に接続.
右上の Slow-Plot にある redis-test をクリックしてデータパネルを表示する: 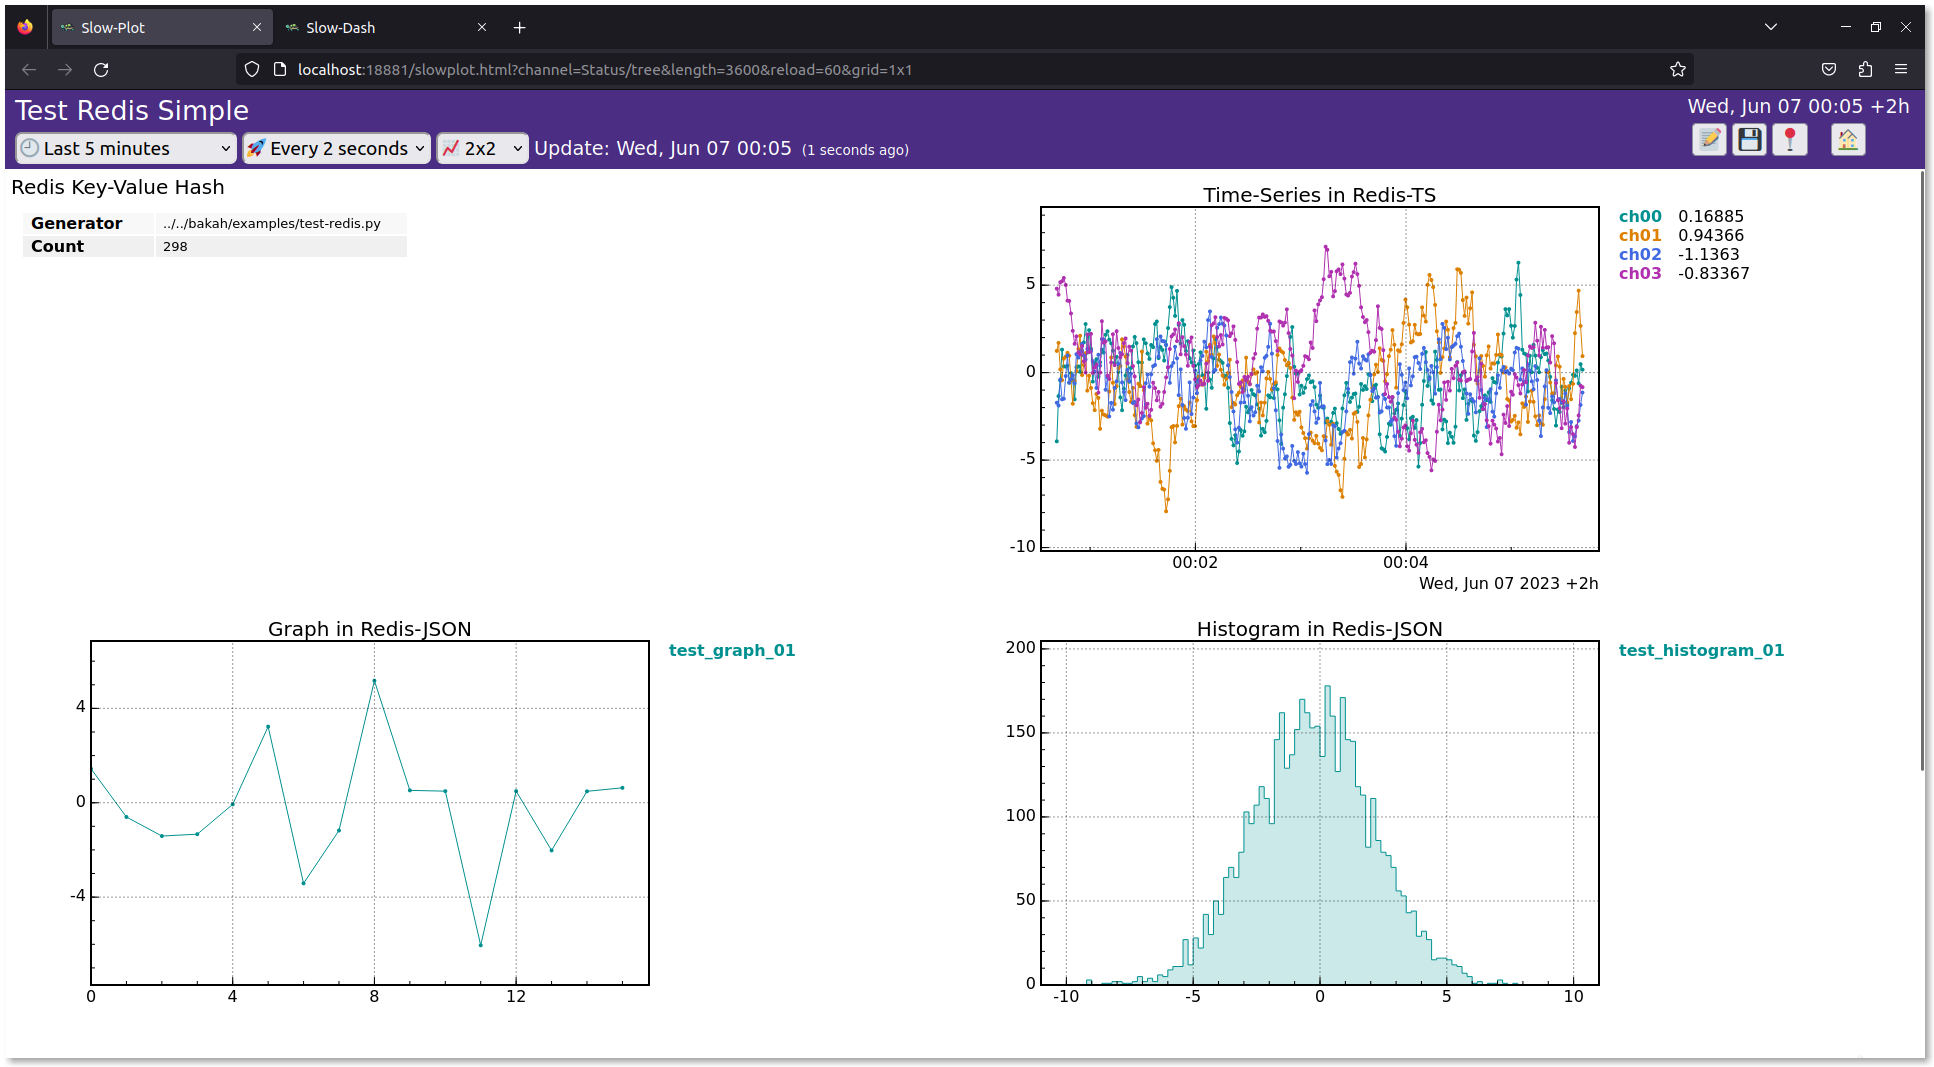
動作テストに使った Projects/Test_Redis_Simple の SlowdashProject.yaml にあるように,Redis サーバのアドレス,ポート番号とデータベース番号を指定するだけで良い.
複数のデータベース番号を使いたいときは,data_source を配列にできる.ただし,これは省略形式で,正式には,以下のようにデータ形式ごとにエントリを作る.こうするとよりきめ細かくパラメータを設定できる.
slowdash_project:
  name: RedisTest
  title: Redis Test, Simple version

  data_source:
    type: Redis
    parameters:
      url: redis://localhost:6379/
      hash: { db: 1 }
      time_series:
        - db: 2
        - db: 3
          suffix: '.second_TS'
object: { db: 1 }| エントリ名 | データ |
|---|---|
hash |
Redis ハッシュ値が SlowDash の Tree として読まれる |
time_series |
Redis TS 値が SlowDash の TimeSeries として読まれる |
object |
Redis JSON 値が SlowDash の Histogram / Graph / etc. として読まれる |
object_time_series |
Redis TS と Redis JSON を組み合わせた SlowDash 形式でオブジェクトの時系列が格納されている場合 |
複数のデーターベース間でキーの重複がある場合は,suffix パラメータを指定すると,SlowDash チャンネル名にサフィックスが付いて区別できる.
Redis TimeSeries で記録したデータは自動で検出され,チャンネルリストに表示される.
Redis の通常の Key-Value でハッシュ値を記録した場合,SlowDash の Tree 型として取り込まれる.動作テスト例の左上のパネル.
Redis JSON を使って特定の構造の JSON オブジェクトを記録すると SlowDash にヒストグラムやグラフとして認識される.
Python のコードはこんな感じ:
import redis
r = redis.Redis('localhost', 6379, 1)
hist = {
  'bins': { 'min': 0, 'max': 100 },
  'counts': [ 3, 5, 8, 14, 11, 3, 6, 4, 4, 1 ]
}
r.json().set('hist00', '$', hist)
あるいは,普通の Key-Value に,JSON 文字列で保存しても良い (C++ とかからならこちらの方が便利かも):
import redis
r = redis.Redis('localhost', 6379, 1)
hist = '''{
  "bins": { "min": 0, "max": 100 },
  "counts": [ 3, 5, 8, 14, 11, 3, 6, 4, 4, 1 ]
}'''
r.set('hist00', hist)
JSON のデータ構造は以下の通り:
counts があることにより,この JSON がヒストグラムだと判別される.counts 配列の長さで決められる.y があることにより,この JSON がグラフだと判別される.Data Model を参照.
Redis TimeSeries と Redis JSON を組み合わせて実現されている.構造が面倒なので,SlowPy ライブラリを使うのが便利だと思う.
こんな感じ:
import sys, os, time
import numpy as np
import slowpy as slp

datastore = slp.DataStore_Redis(host='localhost', port=6379, db=2, retention_length=3600)
histogram = slp.Histogram('test_histogram_01', 100, -10, 10)

while True:
    for i in range(100):
        h.fill(np.random.normal(5, 2))

    # これ
    datastore.write_object_timeseries(histogram)

    time.sleep(1)
現時点では,通常の時系列データとヒストグラムやグラフの時系列データは同じデータベースに共存できないので,この例ではデータベース番号 2 を使用している.
ちなみに,write_object_timeseries() の代わりに write_object() とすると,時刻情報なしで最新版だけを同じキーで保存するようになる(上記の例).